
This page explains how to select the capture target and adjust image quality and load. The settings are common to WindowCapturePlane, WindowCaptureUMG, and CaptureMachine. For the basic procedures, see Usage.
Common capture settings
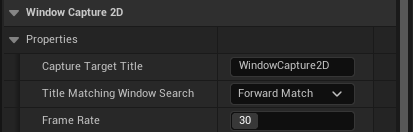
Capture is configured with the following items under Properties.
| Item | Description | Default | Range |
|---|---|---|---|
Capture Target Type |
Capture target type (Window / Desktop) |
Window |
- |
Capture Target Title |
Title string of the window to capture | WindowCapture2D | - |
Title Matching Window Search |
How the title is matched (5 options) | ForwardMatch |
- |
Monitor Index |
Index of the monitor to capture | 0 | 0 - 15 |
Frame Rate |
Capture frame rate (fps) | 30 | 1 - 120 |
Use Trimming |
Enable or disable trimming | Disabled | - |
Trim X, Trim Y |
Top-left corner of the trim region (pixels) | 0 | 0 or more |
Trim Width, Trim Height |
Width and height of the trim region (pixels) | 100 | 0 or more |
Select the target by window title
When Capture Target Type is Window, the plugin matches the string entered in Capture Target Title against window titles and selects one capture target. The matching method is selected with Title Matching Window Search.
| Matching method | Condition |
|---|---|
PerfectMatch |
Exact match with the window title |
ForwardMatch |
The window title starts with the entered string |
PartialMatch |
The window title contains the entered string |
BackwardMatch |
The window title ends with the entered string |
RegularExpression |
Match the window title with a regular expression |
From PerfectMatch through BackwardMatch, upper and lower case are not distinguished. With RegularExpression, the entered string is treated as a regular expression pattern.
Note the following points when selecting the target window.
- Windows with an empty title are not matched.
- If multiple windows match, the first window found is captured.
- If
Capture Target Titleis empty, capture does not start.
Capture the desktop per monitor
Set Capture Target Type to Desktop to capture the desktop screen of a single monitor instead of a window (available in v2.1.0 and later).
- Set
Capture Target TypetoDesktop. - Enter the index of the monitor you want to capture in
Monitor Index. The index is zero-based and can be set from 0 to 15.
In desktop capture, the Capture Target Title setting is not used. If no monitor corresponds to Monitor Index, capture does not start and a Warning is printed to the Output Log.
Trim the captured image
Enable Use Trimming to use only a region of the captured image (available in v2.1.0 and later).
- Enable
Use Trimming. - Enter the top-left corner of the region to cut out, in pixels, in
Trim XandTrim Y. - Enter the width and height of the region, in pixels, in
Trim WidthandTrim Height.
The coordinates are relative to the entire captured image. If the trim region exceeds the captured image, the excess is adjusted automatically. The trimmed size is used as the texture size as is.
Set the frame rate
Frame Rate sets the capture frame rate in the range of 1 to 120 fps. The default is 30 fps.
A higher frame rate makes the motion smoother but increases CPU and GPU load. Adjust it to your purpose: higher when real-time responsiveness matters, lower when you want to reduce resource consumption. For general use, 30 to 60 fps is a reasonable range.
For caveats on high-resolution displays, see the next section.
High-resolution displays and performance
Capturing a maximized window on a high-resolution display such as 4K or 5K consumes significant CPU and GPU resources. The captured image is obtained at the pixel size of the target, so a higher resolution increases the processing per frame.
If the frame rate drops, consider the following measures.
- Lower
Frame Rate - Narrow the region used for capture with
Use Trimming - Reduce the display size of the target window
Whether 4K capture at 60 fps works depends on your PC’s performance. See “Can I capture at 4K 60fps?” in the FAQ for details.
Characteristics of WinRT capture
WindowCapture2D uses the Windows capture feature (Graphics Capture of WinRT). Windows-side behavior therefore affects capturing.
- While capturing, a yellow border may appear around the target window. This is the Windows capture feature indicating that a capture is in progress, and it is not a problem.
- Windows protected by copyright protection (DRM) cannot be captured.
- Some windows cannot be captured even on Windows 11.
Troubleshooting
If the captured image does not appear, check in the following order.
| Symptom | What to check |
|---|---|
| Capture does not start | Check whether the Output Log contains a Target window not found or Target monitor not found Warning |
| The target window is not found | Review the combination of the Capture Target Title string and the Title Matching Window Search matching method |
| A different window is captured | Check whether the match condition is too broad. ForwardMatch and PartialMatch can match unintended windows |
| The frame rate does not reach the target | Check the Frame Rate setting and the resolution of the target window |
Other common questions are collected in the FAQ.