This page describes how to write an echo sketch to an Arduino, send a string from Unreal Engine, and receive the response returned by the Arduino.
Prerequisites
- Complete the Setup and enable UniversalSerial.
- Have an Arduino board (such as an Arduino Uno) and a USB cable.
- Have the Arduino IDE installed on your PC, ready to write a sketch to the Arduino.
Write a sketch to the Arduino
Create a new sketch in the Arduino IDE with the following content. It is an echo program that returns each received line as [Uno] Echo: <received string> (Length: <length>).
void setup() {
  Serial.begin(115200);
  // Discard noise right after startup
  while (Serial.available()) {
    Serial.read();
  }
  Serial.println("Uno ready for communication");
}

void loop() {
  if (!Serial.available()) {
    return;
  }

  char buffer[64];
  int len = Serial.readBytesUntil('\n', buffer, sizeof(buffer) - 1);
  buffer[len] = '\0';

  // Remove trailing newline characters
  while (len > 0 && (buffer[len - 1] == '\r' || buffer[len - 1] == '\n')) {
    buffer[--len] = '\0';
  }

  Serial.print("[Uno] Echo: ");
  Serial.print(buffer);
  Serial.print(" (Length: ");
  Serial.print(len);
  Serial.println(")");
}
After writing the sketch to the Arduino, keep the Arduino IDE’s serial monitor closed. On Windows, UniversalSerial cannot open a port while another application, such as the serial monitor, has it open.
Blueprint overview
When finished, the flow looks like this. BeginPlay creates the Serial Port Manager and opens the port, the response is displayed on screen when received, and EndPlay closes the port.
BeginPlay→ create aSerial Port ManagerwithConstruct Object from Classand store it in a variable- Bind the events
- Specify the port name and communication settings with
Initialize - Start communication with
Open - Send a string with
Send String UTF8 - Receive the echo in the
Data Received Stringevent EndPlay→ end communication withClose
1. Create an Actor Blueprint
- In the Content Browser, create a Blueprint Class → Actor and name it
BP_ArduinoEchoor similar. - Open the Event Graph and show the
BeginPlayandEndPlayevents.
2. Create the SerialPortManager
Execute Construct Object from Class with the Class set to Serial Port Manager, and store the return value in a variable (for example, SerialPort). The type is a Serial Port Manager reference.
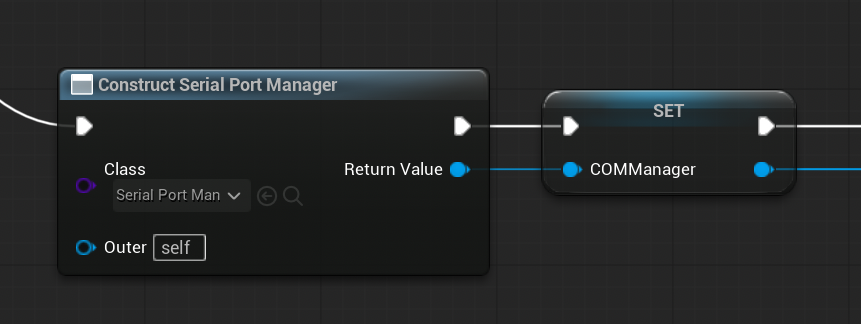
Keep referencing this variable during communication, so store it in a member variable, not a local one. The steps below also use the SerialPort variable.
3. Bind the events
Add the following events from the SerialPort variable.
| Event | When it fires | Parameters |
|---|---|---|
Connected | The port was opened | Serial Port: the manager itself |
Disconnected | The port was closed | Serial Port: the manager itself |
Data Received String | A string was received | Serial Port, Data: the received string |
Error | An error occurred | Serial Port, Error Message: the error content |
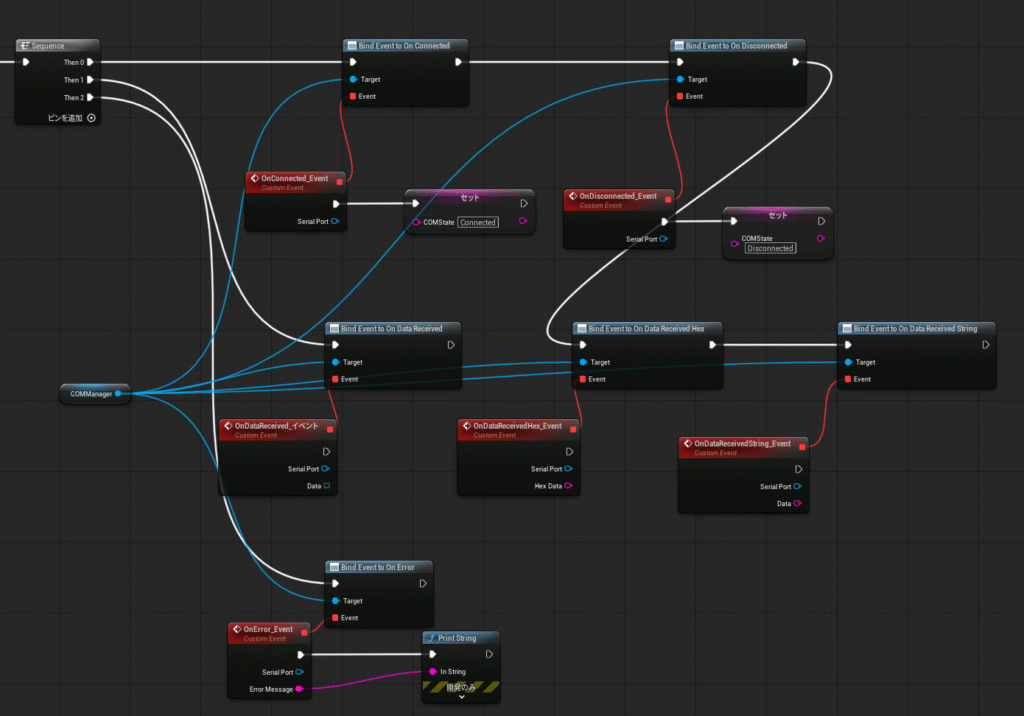
In this procedure, connect Print String to Connected, Data Received String, and Error so you can observe the behavior.
4. Specify the port and settings with Initialize
Run Initialize on SerialPort in the BeginPlay flow. The settings must match the sketch.
| Setting | Value | Description |
|---|---|---|
| Port Name | The first element of Get Available Serial Ports | The port of the Arduino you wrote the sketch to |
| Baud Rate | 115200 | Matches Serial.begin(115200) in the sketch |
| Data Bits | 8 | Use the default |
| Parity | None | Use the default |
| Stop Bits | 1 | Use the default |
| Flow Control | None | Use the default |
| Data Format | UTF8String | Select UTF-8 String to receive strings |
| Initial DTR | true | Use the default |
| Initial RTS | true | Use the default |
You can retrieve the list of currently available port names with the static function Get Available Serial Ports. Run it with the Arduino connected over USB, and pass the first element of the array to Port Name. Port names differ by platform (COM3-style names on Windows, names starting with /dev/ on Mac and Linux). If you want to be precise, you can also type the target port name directly.
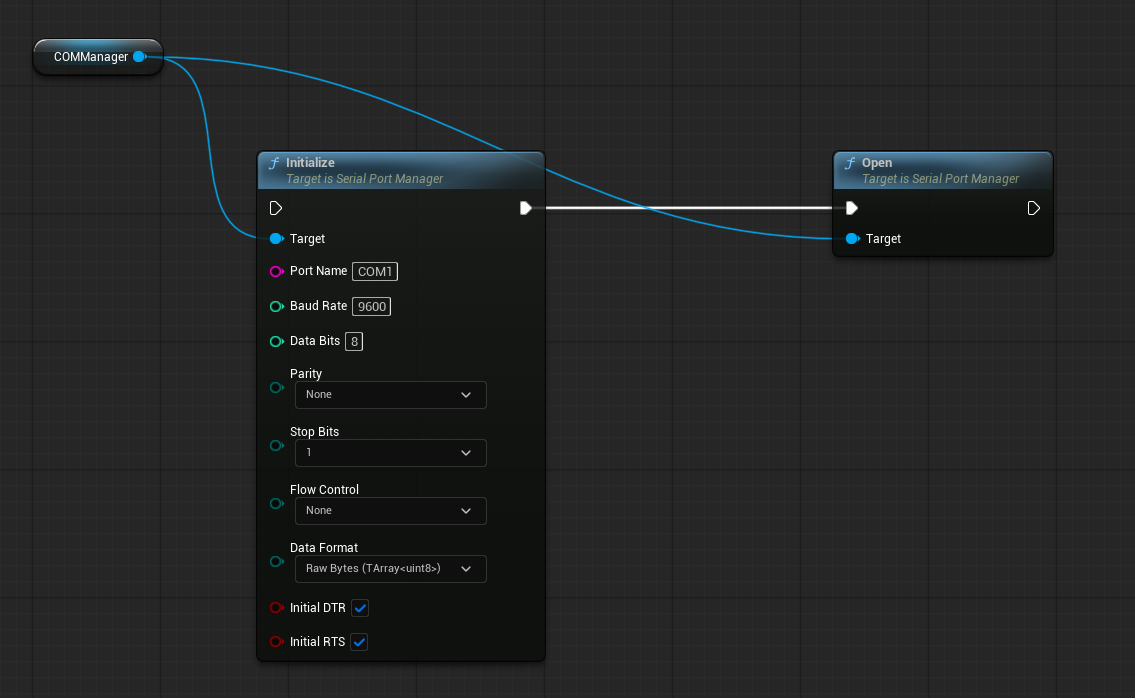
5. Start communication with Open
Connect and run Open on SerialPort after Initialize. When the port opens, the Connected event fires and the Print String output appears.
Opening the port resets the Arduino, so wait 1-2 seconds for the Arduino to finish booting. Insert a Delay (2.0 seconds) after BeginPlay before the send step that follows.
If Open fails, the Error event fires. Check the error message.
6. Send with SendStringUTF8 and receive the echo
Run Send String UTF8 on SerialPort with Hello. Leave Add Delimiter as true. When true, the delimiter (default \r\n) is automatically appended to the end of the string.
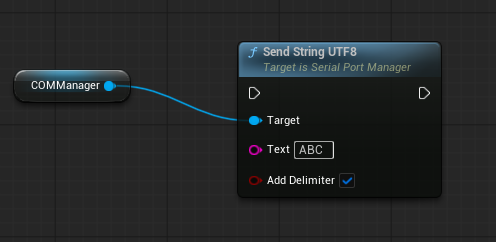
After sending, the Arduino returns the echo and the Data Received String event fires. Data contains the following string.
[Uno] Echo: Hello (Length: 5)
Run PIE. If this output appears on screen, the communication run is complete. To send repeatedly, change the setup so that a keyboard event (for example, Keyboard Events → 1) runs Send String UTF8.
7. End communication
Call Close on SerialPort from EndPlay. When PIE ends, the receive thread stops and the port closes.
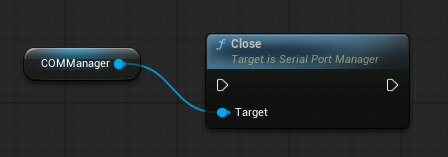
If you switch levels without calling Close, the port may remain open. Always include the shutdown step.
Troubleshooting
| Symptom | What to check |
|---|---|
Connected never fires | Is the Arduino connected? Is the Arduino IDE serial monitor closed? Does Port Name point to the correct port? |
Error shows “Failed to open” | Is another application holding the port? Is the port name correct? |
Data Received String never fires | Does the baud rate match 115200? Is Data Format UTF8String? Did you wait long enough after sending (Arduino reboot)? |
| Received strings are garbled | Do the baud rate and other settings match the sketch? |
| Received strings are cut off midway | Does the sketch respond with a newline (\r\n)? Is the delimiter setting left at the default? |
| Error logs appear when PIE ends | Are you calling Close in EndPlay? |
Only the receive event matching the Data Format is notified. See Switch the data format in Use Cases for details.
Related tutorials
- Use Cases — binary communication, automatic port identification, multiple ports, and ObjectDeliverer integration
- Blueprint API Reference — inputs and outputs of
Initialize, the send nodes, and the events - Data Formats and Production — serial settings, port names per platform, and troubleshooting