This page walks through running a TCP/IP server in Unreal Engine, connecting the ObjectDeliverer Tester app as a client, and completing message exchange in both directions.
Prerequisites
- Complete the Setup page so that ObjectDeliverer is enabled.
- Download the ObjectDeliverer Tester build for your environment from the download page and extract it.
Blueprint overview
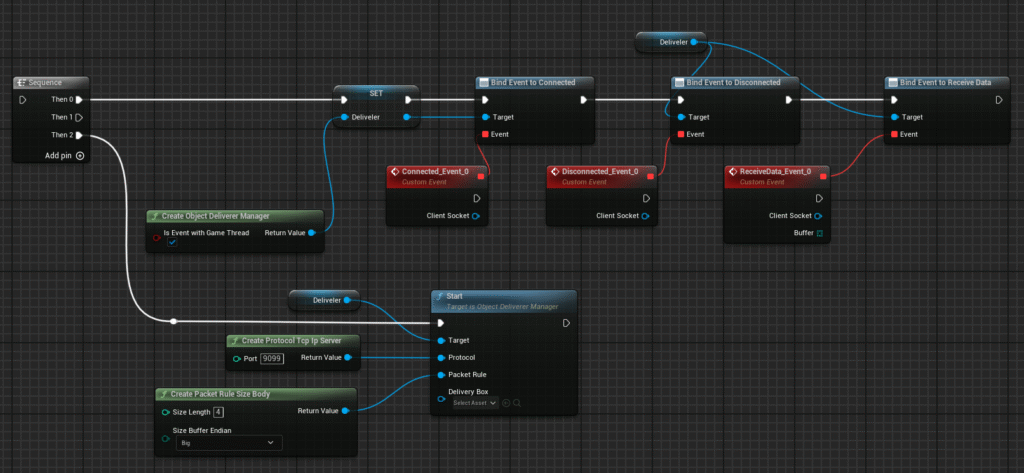
When finished, the Blueprint looks like the following. BeginPlay creates the manager and starts communication, and EndPlay closes it.
1. Create an Actor Blueprint
- In the Content Browser, create a Blueprint Class → Actor and name it something like
BP_ObjectDelivererServer. - Open the Event Graph and show the
BeginPlayandEndPlayevents.
2. Create the ObjectDelivererManager
Run Create Object Deliverer Manager and store the return value in a variable (for example, Deliverer) of type Object Deliverer Manager reference.
Store it in a member variable, not a local one, because the manager must stay referenced during communication. The following steps use this Deliverer variable.
3. Bind the events
Connect the following three events from Deliverer.
| Event | When it fires | Parameters |
|---|---|---|
Connected | Connection is ready | ClientSocket the connected peer |
Disconnected | Connection is lost | ClientSocket the disconnected peer |
ReceiveData | Data is received | ClientSocket the sender, Buffer the received bytes |
In this tutorial, connect Connected and ReceiveData to Print String nodes so you can observe the behavior.
4. Start the TCP/IP server with Start
Connect the following two nodes to the Start node of Deliverer and run it from BeginPlay.
Create Protocol Tcp Ip Server— set the port to9099.Create Packet Rule Size Body— keep the defaults (Size Length = 4,Size Buffer Endian = Big).
Leave the DeliveryBox pin of Start unconnected. Without a DeliveryBox, communication uses byte arrays.
5. Start the server with PIE
Start PIE. At this point Connected has not fired yet: the TCP/IP server is waiting for a client to connect.
6. Connect from the Tester app
Launch ObjectDeliverer Tester and configure it as follows.
- Select TCP/IP Client as the communication method.
- Select SizeBody as the packet division rule.
- Set the destination to
localhostand the port to9099, then connect.
When the connection succeeds, the Connected event fires on the Unreal Engine side and the Print String output appears.
7. Send and receive messages with the Tester
When you send a message from the Tester app, the ReceiveData event fires on the Unreal Engine side. Buffer contains the sent data as a byte array. Print the Length of Buffer with Print String to confirm the received data size.
Next, send from Unreal Engine. Pass any byte array to the Send node of Deliverer and run it; the data arrives in the receive area of the Tester app.
To send and receive strings instead of byte arrays, see Switching the DeliveryBox.
8. Close the communication
Call Close on Deliverer from EndPlay. When PIE ends, connected clients are disconnected and the resources used for communication are released.
If you switch levels without calling Close, connections may remain. Always include the cleanup step.
When something goes wrong
| Symptom | What to check |
|---|---|
Connected never fires | Is the Tester using TCP/IP Client? Do the address and port match localhost:9099? Is a firewall blocking the connection? |
Connects but ReceiveData never fires | Do both sides use the SizeBody rule? Do Size Length and Size Buffer Endian match on both sides? |
| Sending does not reach the Tester | Check for a division rule mismatch. Is the destination actually connected? |
| Errors when PIE ends | Are you calling Close in EndPlay? |
For the mechanism behind packet concatenation and fragmentation, see Switching the packet division rule.
Related tutorials
- Use Cases — how to use UDP, WebSocket, shared memory, and other protocols
- Blueprint API Reference — inputs, outputs, and events of
Start,Send, and the protocol nodes - Data Formats and Production — troubleshooting and security